悟 Kong(人造人篇)
Jun 21, 2020 21:30 · 1959 words · 4 minute read

探索 Kong 的代理实现
过一遍 Kong 官方提供的 5 分钟快速上手 https://docs.konghq.com/2.0.x/getting-started/quickstart/,最简单的一条 API 链需要添加 service 对象以及为其添加一个 route 对象。service 对象,顾名思义,就是对上游服务的抽象,例如数据传输微服务、计费 API 等等,而 route 对象定义了匹配客户端请求的规则,每个 route 一定与一个 service 关联,一个 service 甚至可能有多个 route 与之关联。每一个与某 route 匹配的请求都将被代理至其关联的服务。
假设我们的上游服务为 https://blog.crazytaxii.com,调用 Admin API 将其添加为 service:
$ curl -X POST http://127.0.0.1:8001/services \
    -d "name=example-service" \
    -d "url=https://blog.crazytaxii.com"
{"host":"blog.crazytaxii.com","created_at":1592725613,"connect_timeout":60000,"id":"b136f8d4-9ef3-455c-bb33-db64d1b790ea","protocol":"https","name":"example-service","read_timeout":60000,"port":443,"path":null,"updated_at":1592725613,"retries":5,"write_timeout":60000,"tags":null,"client_certificate":null}
并为此 service 添加一条 route:
$ curl -X POST http://127.0.0.1:8001/services/example-service/routes \
    -d "hosts[]=example.com"
{"id":"ab0facfc-a589-499d-b205-1798c36f7f92","path_handling":"v0","paths":null,"destinations":null,"headers":null,"protocols":["http","https"],"methods":null,"snis":null,"service":{"id":"b136f8d4-9ef3-455c-bb33-db64d1b790ea"},"name":null,"strip_path":true,"preserve_host":false,"regex_priority":0,"updated_at":1592725755,"sources":null,"hosts":["example.com"],"https_redirect_status_code":426,"tags":null,"created_at":1592725755}
然后我们通过代理访问 https://blog.crazytaxii.com:
$ curl http://127.0.0.1:8000/ -H "Host: example.com"
我们继续来探索 Kong 如何实现这个代理过程。既然 Kong 基于 OpenResty,而 OpenResty 的核心代理就是 Nginx,以下是一份典型的 Nginx 配置文件(完整的配置请查看 https://www.nginx.com/resources/wiki/start/topics/examples/full/):
http {
  include    conf/mime.types;
  include    /etc/nginx/proxy.conf;
  include    /etc/nginx/fastcgi.conf;
  index    index.html index.htm index.php;

  default_type application/octet-stream;
  log_format   main '$remote_addr - $remote_user [$time_local]  $status '
    '"$request" $body_bytes_sent "$http_referer" '
    '"$http_user_agent" "$http_x_forwarded_for"';
  access_log   logs/access.log  main;
  sendfile     on;
  tcp_nopush   on;
  server_names_hash_bucket_size 128; # this seems to be required for some vhosts

  server { # simple reverse-proxy
    listen       80;
    server_name  domain2.com www.domain2.com;
    access_log   logs/domain2.access.log  main;

    # serve static files
    location ~ ^/(images|javascript|js|css|flash|media|static)/  {
      root    /var/www/virtual/big.server.com/htdocs;
      expires 30d;
    }

    # pass requests for dynamic content to rails/turbogears/zope, et al
    location / {
      proxy_pass      http://127.0.0.1:8080;
    }
  }

  upstream big_server_com {
    server 127.0.0.3:8000 weight=5;
    server 127.0.0.3:8001 weight=5;
    server 192.168.0.1:8000;
    server 192.168.0.1:8001;
  }

  server { # simple load balancing
    listen          80;
    server_name     big.server.com;
    access_log      logs/big.server.access.log main;

    location / {
      proxy_pass      http://big_server_com;
    }
  }
}
那美克星篇中已经说过 Kong 在启动时会通过源码中内置的模板渲染出一份 nginx.conf 配置文件,macOS 环境中我们可以在 /usr/local/opt/kong/ 路径下查看 nginx-kong.conf 文件:
upstream kong_upstream {
    server 0.0.0.1;
    balancer_by_lua_block {
        Kong.balancer();
    }

    # injected nginx_upstream_* directives
    keepalive_requests 100;
    keepalive_timeout 60s;
    keepalive 60;
}

server {
    server_name kong;
    listen 0.0.0.0:8000 reuseport backlog=16384;
    listen 0.0.0.0:8443 ssl http2 reuseport backlog=16384;

    rewrite_by_lua_block {
        Kong.rewrite();
    }

    access_by_lua_block {
        Kong.access();
    }

    header_filter_by_lua_block {
        Kong.header_filter();
    }

    body_filter_by_lua_block {
        Kong.body_filter();
    }

    log_by_lua_block {
        Kong.log();
    }

    location / {
        default_type                    '';

        set $upstream_scheme            '';
        set $upstream_uri               '';

        proxy_pass            $upstream_scheme://kong_upstream$upstream_uri;
    }
}
与普通的 Nginx 配置一样,server context 也是嵌套在 http context 中,nginx-kong.conf 中有两段 server context 分别对应了业务端口 8000/8443 与管理端口 8001/8444。IP 端口字段下就是非常熟悉的 *_by_lua 锚点:
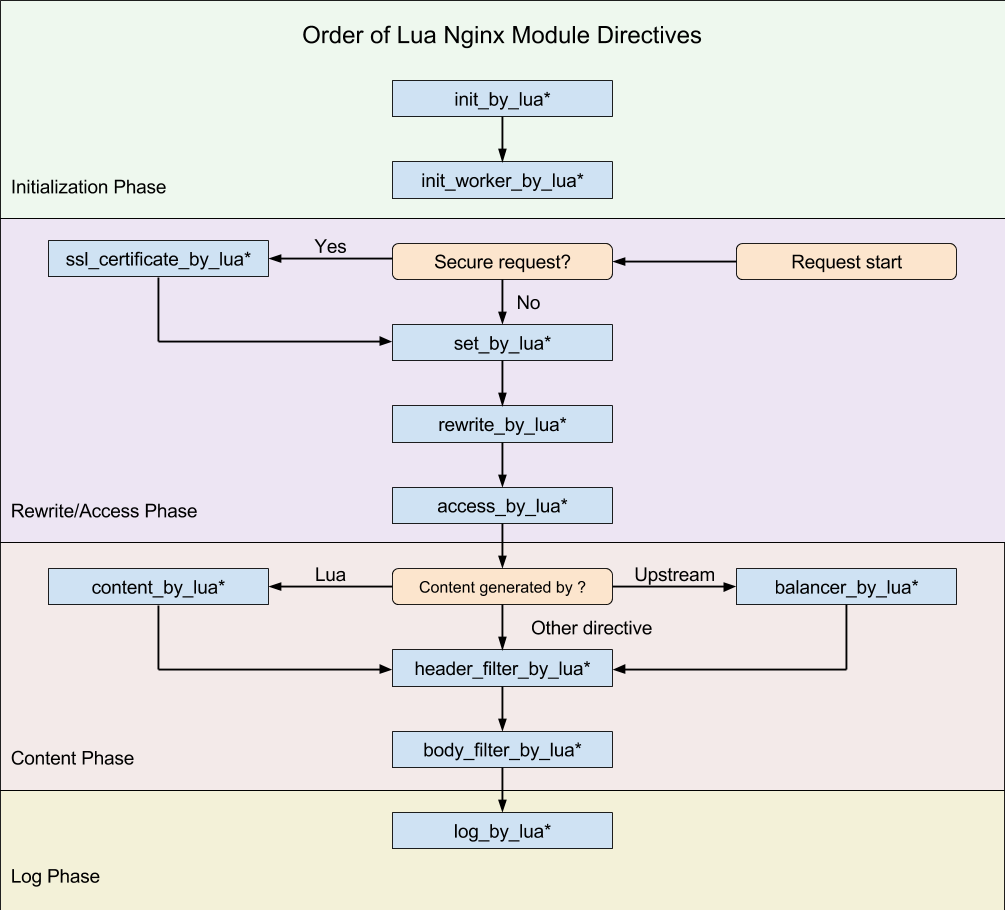
当 HTTP 请求
GET / HTTP/1.1
Host: example.com:8000
到达 Kong,rewrite_by_lua_block 锚点首先被触发,执行业务代码 Kong.rewrite() https://github.com/Kong/kong/blob/release/2.0.4/kong/init.lua#L613-L657;
然后 access_by_lua_block 锚点被触发,执行业务代码 Kong.access() https://github.com/Kong/kong/blob/release/2.0.4/kong/init.lua#L660-L729 后网关将请求转发至上游。
function Kong.access()
  -- ...

  kong_global.set_phase(kong, PHASES.access)

  runloop.access.before(ctx)

  ctx.delay_response = true

  -- ...
end
开启上帝视角,我们直奔 runloop.access.before(ctx) 方法的定义所在 https://github.com/Kong/kong/blob/release%2F2.0.4/kong/runloop/handler.lua#L996-L1147
before = function(ctx)
  -- routing request
  local router = get_updated_router()
  local match_t = router.exec()
  if not match_t then
    return kong.response.exit(404, { message = "no Route matched with those values" })
  end

  local http_version   = ngx.req.http_version()
  local scheme         = var.scheme
  local host           = var.host
  local port           = tonumber(var.server_port, 10)
  local content_type   = var.content_type

  local route          = match_t.route
  local service        = match_t.service
  local upstream_url_t = match_t.upstream_url_t

  local realip_remote_addr = var.realip_remote_addr
  local forwarded_proto
  local forwarded_host
  local forwarded_port

  -- ...

  balancer_prepare(ctx, match_t.upstream_scheme,
                   upstream_url_t.type,
                   upstream_url_t.host,
                   upstream_url_t.port,
                   service, route)

  ctx.router_matches = match_t.matches

  -- `uri` is the URI with which to call upstream, as returned by the
  --       router, which might have truncated it (`strip_uri`).
  -- `host` is the original header to be preserved if set.
  var.upstream_scheme = match_t.upstream_scheme -- COMPAT: pdk
  var.upstream_uri    = match_t.upstream_uri
  var.upstream_host   = match_t.upstream_host

  -- ...
end
-
router.exec()方法 https://github.com/Kong/kong/blob/release%2F2.0.4/kong/router.lua#L1689-L1749 将上面的 HTTP 请求与我们添加的 route 对象匹配:function self.exec() local req_method = get_method() local req_uri = var.request_uri local req_host = var.http_host or "" local req_scheme = var.scheme local sni = var.ssl_server_name local headers local err -- ... local match_t = find_route(req_method, req_uri, req_host, req_scheme, nil, nil, -- src_ip, src_port nil, nil, -- dst_ip, dst_port sni, headers) if not match_t then return nil end -- ... return match_t end根据 nginx 内置变量
- request_uri
- scheme
- http_host 也就是 host
还有 HTTP 方法即可从 route 数据表中查出相应的 route 对象
local match_t = find_route(req_method, req_uri, req_host, req_scheme, nil, nil, nil, nil, sni, headers)。有了 route 对象也就得到了与之绑定的 service 对象的 id。Nginx 配置文件中
proxy_pass就是反向代理,upstream_scheme和upstream_uri的值还有 route、service 对象由find_route()函数 https://github.com/Kong/kong/blob/release%2F2.0.4/kong/router.lua#L1308-L1682 一并返回。 -
balancer_prepare()函数 https://github.com/Kong/kong/blob/release%2F2.0.4/kong/runloop/handler.lua#L762-L817 将 service 的协议、host(域名)与端口整合至balancer_data对象并保存至 nginx 的ctx变量中。function balancer_prepare(ctx, scheme, host_type, host, port, service, route) local balancer_data = { scheme = scheme, -- scheme for balancer: http, https type = host_type, -- type of 'host': ipv4, ipv6, name host = host, -- target host per `service` entity port = port, -- final target port try_count = 0, -- retry counter tries = {}, -- stores info per try -- ip = nil, -- final target IP address -- balancer = nil, -- the balancer object, if any -- hostname = nil, -- hostname of the final target IP -- hash_cookie = nil, -- if Upstream sets hash_on_cookie -- balancer_handle = nil, -- balancer handle for the current connection } do local s = service or EMPTY_T balancer_data.retries = s.retries or 5 balancer_data.connect_timeout = s.connect_timeout or 60000 balancer_data.send_timeout = s.write_timeout or 60000 balancer_data.read_timeout = s.read_timeout or 60000 end ctx.service = service ctx.route = route ctx.balancer_data = balancer_data ctx.balancer_address = balancer_data -- for plugin backward compatibility -- ... end
回到 runloop.access.before(ctx) 方法,上述两个 nginx 变量在此赋值 https://github.com/Kong/kong/blob/release%2F2.0.4/kong/runloop/handler.lua#L1108,于是请求将被代理至 kong_upstream,进而执行 balancer_by_lua_block 锚点中的业务代码 https://github.com/Kong/kong/blob/release%2F2.0.4/kong/init.lua#L732-L855
function Kong.balancer()
  -- ...

  kong_global.set_phase(kong, PHASES.balancer)

  local balancer_data = ctx.balancer_data
  local tries = balancer_data.tries
  local current_try = {}
  balancer_data.try_count = balancer_data.try_count + 1
  tries[balancer_data.try_count] = current_try

  -- ...

  current_try.ip   = balancer_data.ip
  current_try.port = balancer_data.port

  -- set the targets as resolved
  ngx_log(ngx_DEBUG, "setting address (try ", balancer_data.try_count, "): ",
                     balancer_data.ip, ":", balancer_data.port)
  local ok, err = set_current_peer(balancer_data.ip, balancer_data.port)
  if not ok then
    ngx_log(ngx_ERR, "failed to set the current peer (address: ",
            tostring(balancer_data.ip), " port: ", tostring(balancer_data.port),
            "): ", tostring(err))

    ctx.KONG_BALANCER_ENDED_AT = get_now_ms()
    ctx.KONG_BALANCER_TIME = ctx.KONG_BALANCER_ENDED_AT - ctx.KONG_BALANCER_START
    ctx.KONG_PROXY_LATENCY = ctx.KONG_BALANCER_ENDED_AT - ctx.KONG_PROCESSING_START

    return ngx.exit(500)
  end
end
如果我们将日志等级设置为 debug,在 error log 中能够看到 2020/06/21 20:35:00 [debug] 77323#0: *440 [lua] init.lua:822: balancer(): setting address (try 1): 47.97.185.8:443,域名 blog.crazytaxii.com 已被转换成对应的服务器 IP。set_current_peer() 为 ngx.balancer 库提供的方法,动态修改上游为业务目标服务器。
至此 Kong 是如何将我们的业务请求与预先设定的 route 还有 service 对象对应起来完整过程也就水落石出了。