Docker 基础概念
Jan 20, 2019 22:57 · 5148 words · 11 minute read

我们逐步深入 Docker 的基础组件:
Docker 引擎(Docker Engine)
Docker 引擎是 Docker 的运行层。它是一个轻量的运行时和工具,用来管理容器,镜像和构建等。在原生的 Linux 系统上运行,由以下部分组成:
- 在主机上运行的 Docker 守护进程。
- Docker 客户端,与守护进程通信来执行命令。
- 与 Docker 守护进程远程交互的 REST API。
Docker 客户端(Docker Client)
Docker 客户端就像 Docker 的最终用户一样与之通信。可以认为是 Docker 的 UI。举个例子,当你…
docker build iampeekay/someImage .
你正在与 Docker 客户端通信,然后 Docker 客户端将你的指令传递给 Docker 守护进程。
Docker 守护进程(Docker Daemon)
Docker 守护进程真正执行被发送到 Docker 客户端的命令——比如构建、运行和分发你的容器。Docker 守护运行在主机上,但是作为用户,你永远不会直接与守护进程通信。Docker 客户端也可以在主机上运行,但没必要。它可以在不同的机器上运行,并与在主机上运行的 Docker 守护进程通信。
Dockerfile
Dockerfile 是编写构建 Docker 镜像的指令的文件。 这些指令可以是:
RUN apt-get y install some-package:运行——安装软件包EXPOSE 8000:暴露端口ENV ANT_HOME /usr/local/apache-ant:传递环境变量
等等。一旦设置完了 Dockerfile,就可以使用 docker build 命令从中构建镜像。这是 Dockerfile 的一个例子:
# Start with ubuntu 14.04
FROM ubuntu:14.04

MAINTAINER preethi kasireddy iam.preethi.k@gmail.com

# For SSH access and port redirection
ENV ROOTPASSWORD sample

# Turn off prompts during installations
ENV DEBIAN_FRONTEND noninteractive
RUN echo "debconf shared/accepted-oracle-license-v1-1 select true" | debconf-set-selections
RUN echo "debconf shared/accepted-oracle-license-v1-1 seen true" | debconf-set-selections

# Update packages
RUN apt-get -y update

# Install system tools / libraries
RUN apt-get -y install python3-software-properties \
    software-properties-common \
    bzip2 \
    ssh \
    net-tools \
    vim \
    curl \
    expect \
    git \
    nano \
    wget \
    build-essential \
    dialog \
    make \
    build-essential \
    checkinstall \
    bridge-utils \
    virt-viewer \
    python-pip \
    python-setuptools \
    python-dev

# Install Node, npm
RUN curl -sL https://deb.nodesource.com/setup_4.x | sudo -E bash -
RUN apt-get install -y nodejs

# Add oracle-jdk7 to repositories
RUN add-apt-repository ppa:webupd8team/java

# Make sure the package repository is up to date
RUN echo "deb http://archive.ubuntu.com/ubuntu precise main universe" > /etc/apt/sources.list

# Update apt
RUN apt-get -y update

# Install oracle-jdk7
RUN apt-get -y install oracle-java7-installer

# Export JAVA_HOME variable
ENV JAVA_HOME /usr/lib/jvm/java-7-oracle

# Run sshd
RUN apt-get install -y openssh-server
RUN mkdir /var/run/sshd
RUN echo "root:$ROOTPASSWORD" | chpasswd
RUN sed -i 's/PermitRootLogin without-password/PermitRootLogin yes/' /etc/ssh/sshd_config

# SSH login fix. Otherwise user is kicked off after login
RUN sed 's@session\s*required\s*pam_loginuid.so@session optional pam_loginuid.so@g' -i /etc/pam.d/sshd

# Expose Node.js app port
EXPOSE 8000

# Create tap-to-android app directory
RUN mkdir -p /usr/src/my-app
WORKDIR /usr/src/my-app

# Install app dependencies
COPY . /usr/src/my-app
RUN npm install

# Add entrypoint
ADD entrypoint.sh /entrypoint.sh
RUN chmod +x /entrypoint.sh
ENTRYPOINT ["/entrypoint.sh"]

CMD ["npm", "start"]
Docker 镜像(Docker image)
镜像是从 Dockerfile 中编写的一组指令构建的只读模板。镜像定义了你想要打包的应用程序和它的依赖项,看起来像/*and/*的启动时运行的进程。
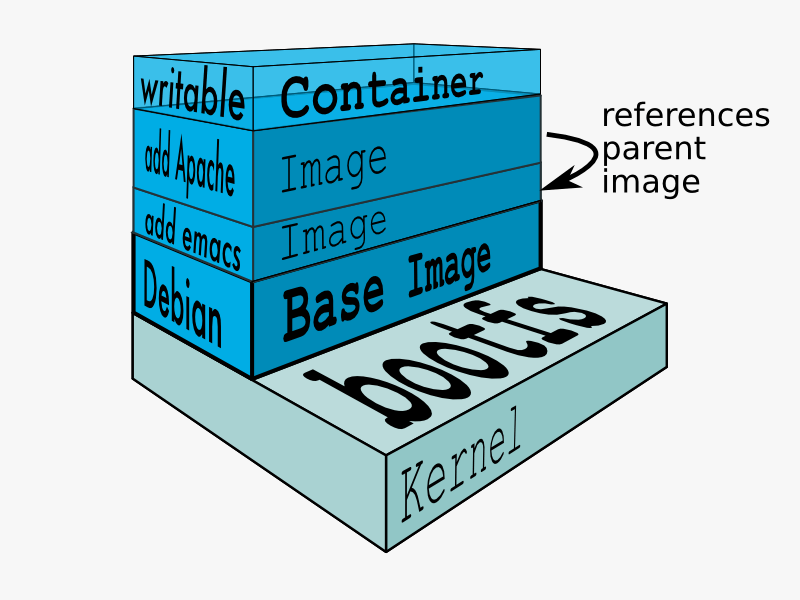
Docker 镜像是用 Dockerfile 构建的。Dockerfile 中的每条指令都为镜像添加了一个新的“镜像层”,代表镜像系统文件的一部分,可以添加或替换它下面的镜像层。镜像层是 Docker 轻量且强大的关键。Docker 使用联合文件系统来实现:
联合文件系统(Union File Systems)
Docker 使用联合文件系统来构建镜像。你可以把它看作可堆叠的文件系统,意味着可以透明地覆盖单独文件系统(也叫作分支)的文件和目录形成单个文件系统。
在重叠分支内具有相同路径的目录的内容被视为单个合并目录,这避免了为每一层都创建单独的副本的必要,而是它们都可以被赋予指向同一资源的指针;当某些层要被改变时,它会创建一个副本并修改一个本地的副本,保持原始版本不变。这就是文件系统为什么看起来可写。(换句话说,一个 copy-on-write 系统)
分层系统有两个主要优点:
- **避免复制:**每次使用镜像创建和运行新容器时,镜像层都有助于避免复制完整的文件集,从而使 docker 容器的实例化非常快速且便宜。
- **镜像层隔离:**更改快得多——当你要更改一个镜像时,Docker 只会将更新传播到被修改的镜像层。
卷(Volumes)
卷是容器的“数据”部分,在创建容器时初始化。卷允许你持久化并共享容器的数据。数据卷与默认的 Union File System 是分开的,作为主机文件系统上的普通目录和文件存在。因此,即使你销毁,更新,或者重建容器,数据卷不会被触碰。当你想要更新卷时,可以直接对其进行更改。(作为附加的奖励,数据卷可以在多个容器之间共享和重用,这相当灵巧。)
Docker 容器(Docker container)
综上所述,Docker 容器将应用程序和运行所需的所有内容封装到一个黑盒中,包括了操作系统、应用程序代码、运行时、系统工具、系统库等等。Docker 容器是基于 Docker 镜像构建的。由于镜像是只读的,因此 Docker 在镜像的只读文件系统上添加了一个读写文件系统来创建容器。
然后创建容器,Docker 创建一个网络接口,这样容器可以与本地主机通讯,将可用的 IP 地址附加到容器,并在定义镜像时执行指定的运行应用程序的进程。
一旦你成功创建容器,你不需要更改就可以在任意环境中运行。
深入容器
让我很好奇的是容器如何实现的,尤其是因为容器周围没有任何抽象的基础设施边界。
术语“容器”实际上只是个抽象概念用来描述不同的组件如何协同工作以抽象为“容器”。我们快速地浏览一下:
1)命名空间(Namespaces)
命名空间为容器提供了自己的底层 Linux 系统视图,限制了容器可以查看和访问的内容。当你运行容器时,Docker 创建特定容器将使用的命名空间。
Docker 使用内核几种不同类型的命名空间,例如:
- NET:为容器提供自己的系统网络栈视图(自己的网络设备,IP 地址,IP 路由表,/proc/net 目录,端口号等)。
- PID:PID 代表进程 ID。如果你曾在命令行中运行
ps aux来检查系统上正在运行的进程,那么你将看到一个名为“PID”的列。PID 命名空间为容器提供了它们可以查看和交互的进程的范围视图,包括独立的 PID 1,它是所有进程的祖先。 - MNT:为容器提供自己视角的系统上的挂载。所以,不同命名空间中的进程有不同的文件系统层次结构视图。
- UTS:UTS 代表 UNIX 分时系统。它允许进程识别系统标识符(主机名、域名等)。UTS 允许容器拥有自己的主机名和 NIS 域名,使之独立于其他容器和主机系统。
- IPC:IPC 代表进程内通讯。IPC 命名空间负责隔离每个容器内运行的进程之间的 IPC 资源。
- USER:这个命名空间用来隔离每个容器内的用户。它的功能是允许容器与主机系统相比有 uid(用户 ID)和 gid(组 ID)范围的不同视图。因此,进程的 uid 和 gid 可以在用户命名空间的内部和外部不同,这也允许进程在容器外部拥有非特权用户,而不会牺牲容器内的 root 权限。
Docker 使用命名空间隔离并开始创建容器。下一个功能被称为控制组。
2)控制组(Control groups)
控制组(也称为 cgroups)是用于隔离、确定优先级并审计一组进程的资源占用(CPU,内存,磁盘 I/O,网络等)的 Linux 内核功能。从这个意义上讲,cgroup 确保 Docker 容器只使用它们所需要的资源——如果有必要,还可以设置容器使用的资源限制。cgroup 还确保单个容器不会耗尽其中一个资源并导致整个系统崩溃。
最后,联合文件系统是 Docker 使用的另一个功能:
3)隔离联合文件系统(Isolated Union file system)
已在 Docker 镜像部分中描述:)
这就是 Docker 容器的全部内容(当然,真正深奥的在实现细节中——比如如何管理各个组件之间的交互)。
未来:Docker 和虚拟机将共存
Docker 已经获得了非常多的青睐,但是我不认为它会对虚拟机构成真正的威胁。容器将继续发挥作用,但有许多场景虚拟机仍然更适合。
举个例子,如果你要在多个服务器上运行多个应用程序,使用虚拟机就可能是有意义的。相反,如果你要在运行单个应用程序的多个“副本”,Docker 优势更明显。
此外,虽然容器允许你将应用程序分解为更多功能性的服务单元以创建关注点分离,这也意味着需要管理的部分数量的增长,可能会失控。
安全性也是 Docker 容器所关注的一个领域——因为容器共享同一个内核,容器之间的壁垒相对更薄。虽然完整的虚拟机只能调用主机 hypervisor,但 Docker 容器可以调用主机内核,从而为攻击创建更大的范围。当安全性特别重要时,开发人员更愿意选择虚拟机,抽象的硬件隔离使互相干扰变得更为困难。
当然,类似安全和管理这样的问题肯定会随着容器在生产中的更多曝光和用户的进一步审查而发展。当前,关于容器与虚拟机之间的争论对于那些每天使用它们的开发者来说真的是最好的!
Fundamental Docker Concepts
Now that we’ve got the big picture in place, let’s go through the fundamental parts of Docker piece by piece:
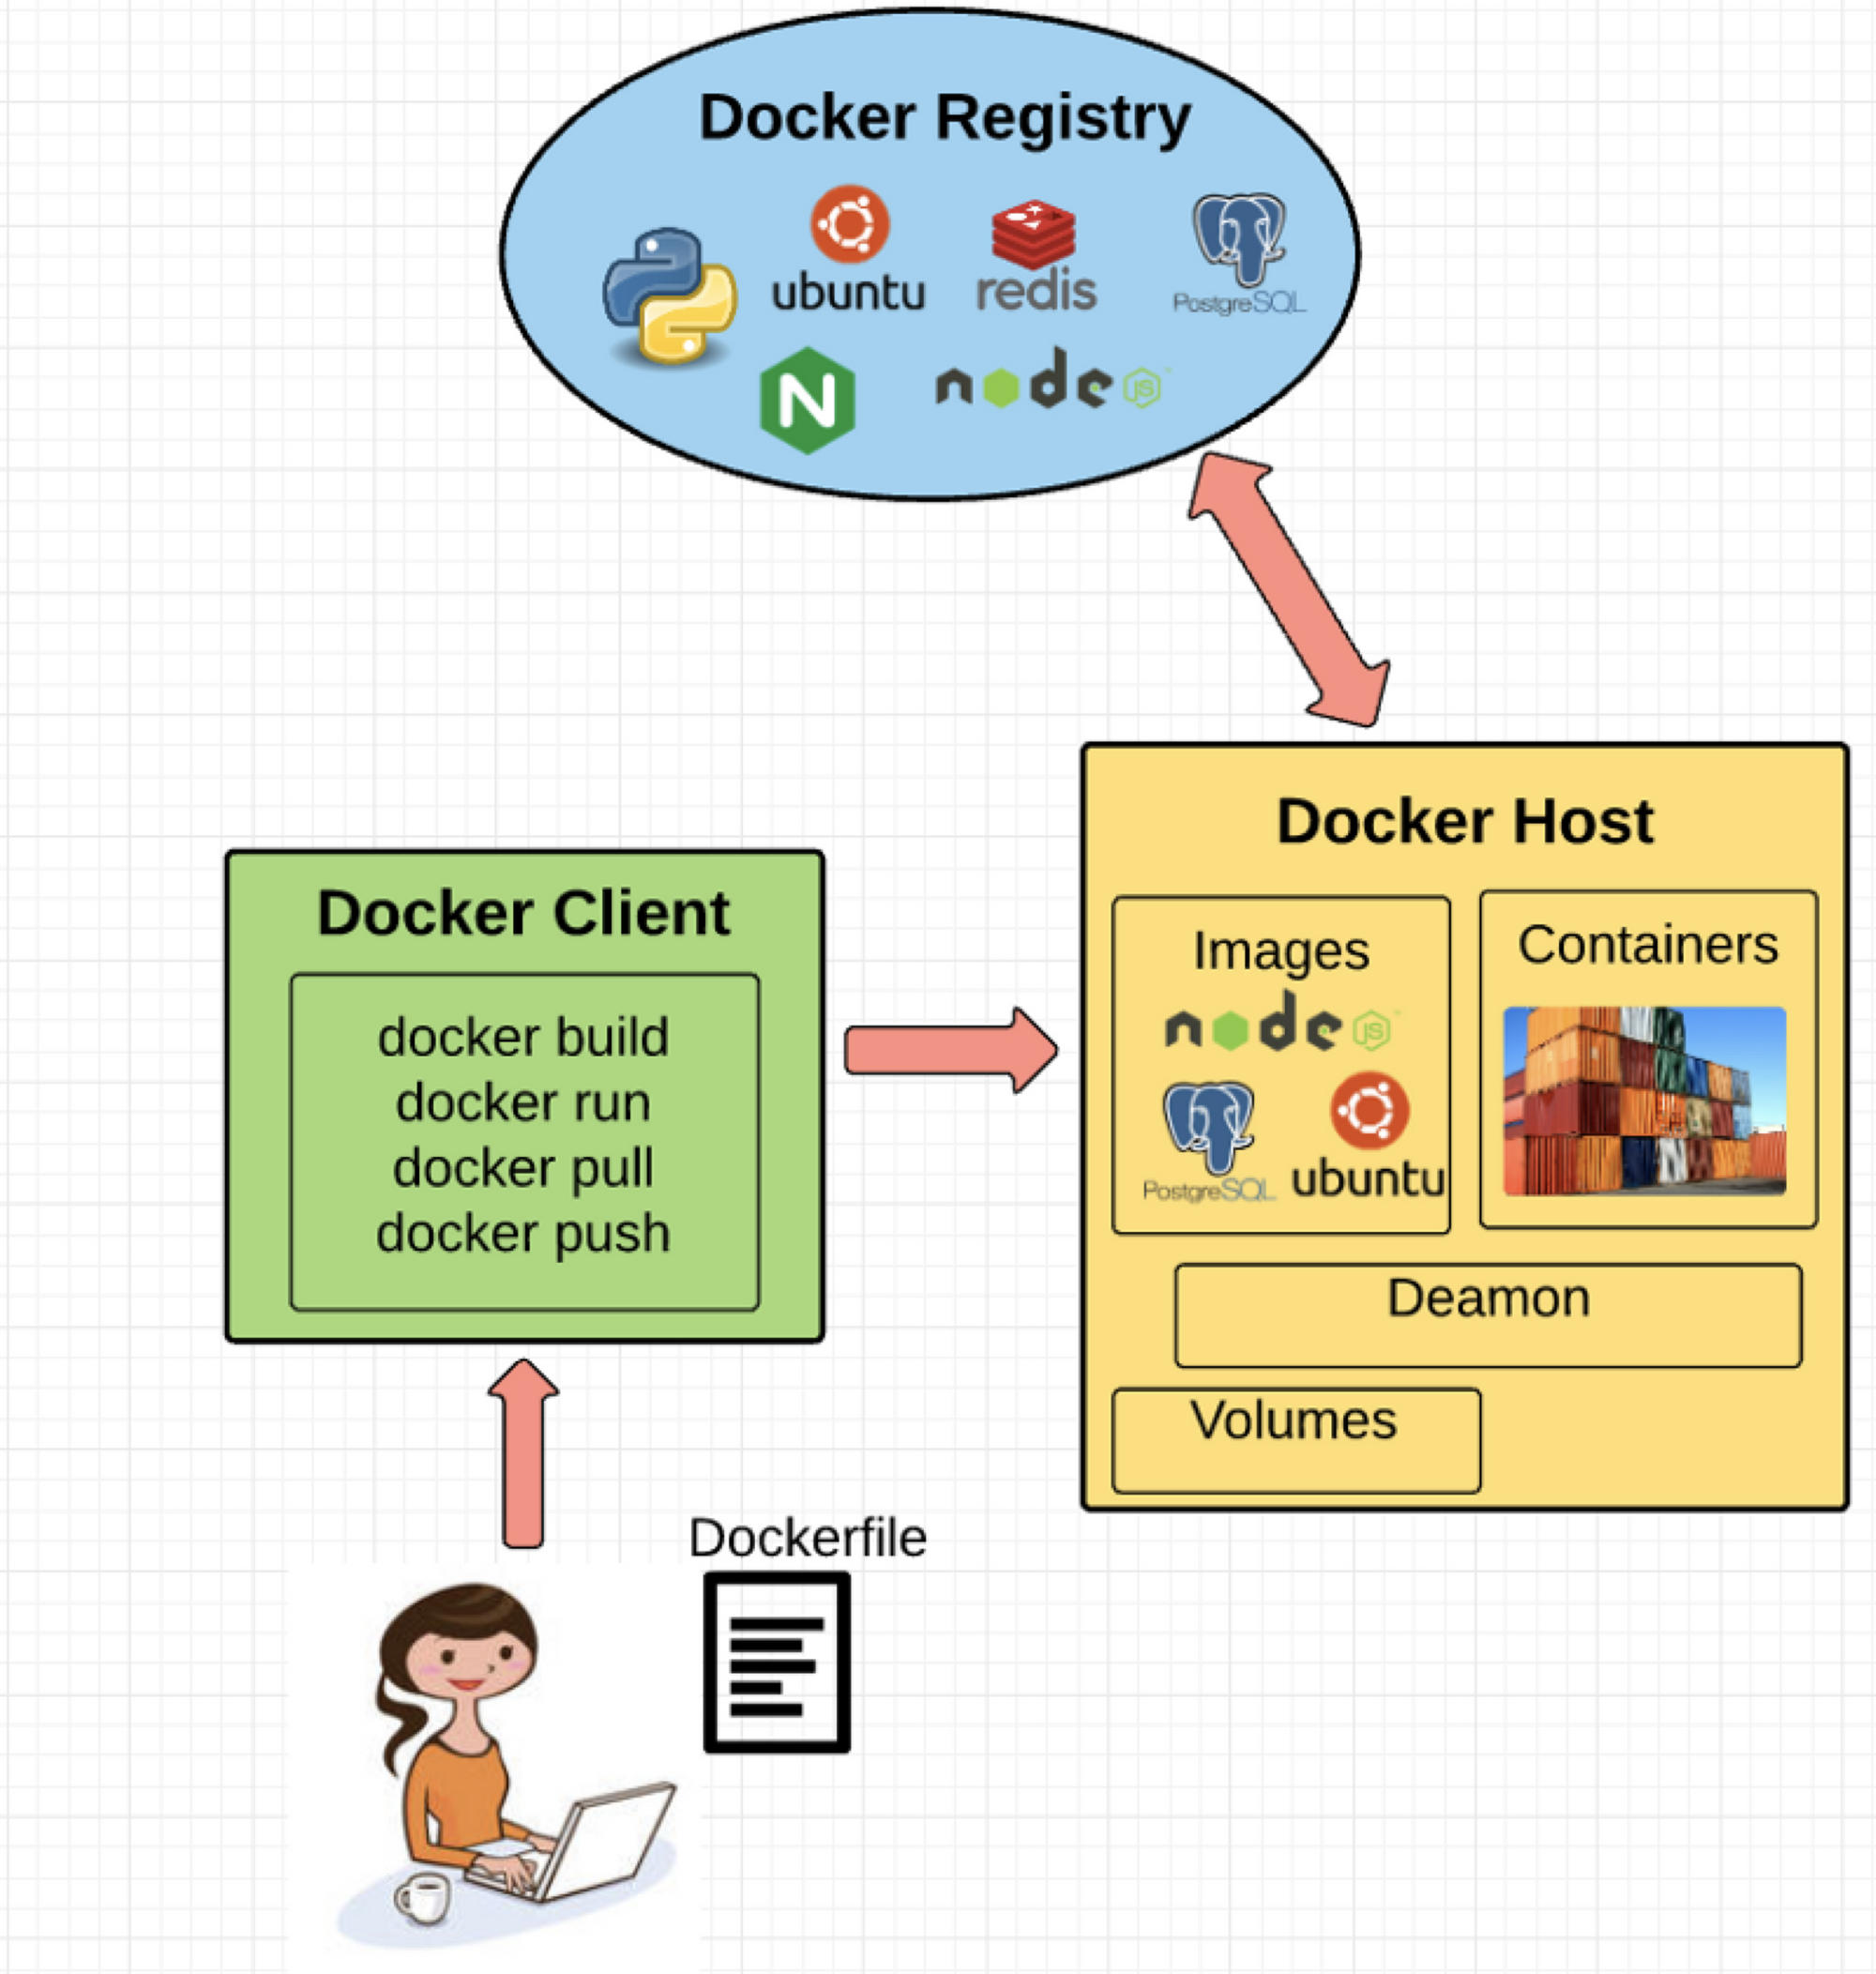
Docker Engine
Docker engine is the layer on which Docker runs. It’s a lightweight runtime and tooling that manages containers, images, builds, and more. It runs natively on Linux systems and is made up of:
- A Docker Daemon that runs in the host computer.
- A Docker Client that then communicates with the Docker Daemon to execute commands.
- A REST API for interacting with the Docker Daemon remotely.
Docker Client
The Docker Client is what you, as the end-user of Docker, communicate with. Think of it as the UI for Docker. For example, when you do…
docker build iampeekay/someImage .
you are communicating to the Docker Client, which then communicates your instructions to the Docker Daemon.
Docker Daemon
The Docker daemon is what actually executes commands sent to the Docker Client — like building, running, and distributing your containers. The Docker Daemon runs on the host machine, but as a user, you never communicate directly with the Daemon. The Docker Client can run on the host machine as well, but it’s not required to. It can run on a different machine and communicate with the Docker Daemon that’s running on the host machine.
Docker file
A Dockerfile is where you write the instructions to build a Docker image. These instructions can be:
RUN apt-get y install some-package: to install a software packageEXPOSE 8000: to expose a portENV ANT_HOME /usr/local/apache-ant: to pass an environment variable
and so forth. Once you’ve got your Dockerfile set up, you can use the docker build command to build an image from it. Here’s an example of a Dockerfile:
# Start with ubuntu 14.04
FROM ubuntu:14.04

MAINTAINER preethi kasireddy iam.preethi.k@gmail.com

# For SSH access and port redirection
ENV ROOTPASSWORD sample

# Turn off prompts during installations
ENV DEBIAN_FRONTEND noninteractive
RUN echo "debconf shared/accepted-oracle-license-v1-1 select true" | debconf-set-selections
RUN echo "debconf shared/accepted-oracle-license-v1-1 seen true" | debconf-set-selections

# Update packages
RUN apt-get -y update

# Install system tools / libraries
RUN apt-get -y install python3-software-properties \
    software-properties-common \
    bzip2 \
    ssh \
    net-tools \
    vim \
    curl \
    expect \
    git \
    nano \
    wget \
    build-essential \
    dialog \
    make \
    build-essential \
    checkinstall \
    bridge-utils \
    virt-viewer \
    python-pip \
    python-setuptools \
    python-dev

# Install Node, npm
RUN curl -sL https://deb.nodesource.com/setup_4.x | sudo -E bash -
RUN apt-get install -y nodejs

# Add oracle-jdk7 to repositories
RUN add-apt-repository ppa:webupd8team/java

# Make sure the package repository is up to date
RUN echo "deb http://archive.ubuntu.com/ubuntu precise main universe" > /etc/apt/sources.list

# Update apt
RUN apt-get -y update

# Install oracle-jdk7
RUN apt-get -y install oracle-java7-installer

# Export JAVA_HOME variable
ENV JAVA_HOME /usr/lib/jvm/java-7-oracle

# Run sshd
RUN apt-get install -y openssh-server
RUN mkdir /var/run/sshd
RUN echo "root:$ROOTPASSWORD" | chpasswd
RUN sed -i 's/PermitRootLogin without-password/PermitRootLogin yes/' /etc/ssh/sshd_config

# SSH login fix. Otherwise user is kicked off after login
RUN sed 's@session\s*required\s*pam_loginuid.so@session optional pam_loginuid.so@g' -i /etc/pam.d/sshd

# Expose Node.js app port
EXPOSE 8000

# Create tap-to-android app directory
RUN mkdir -p /usr/src/my-app
WORKDIR /usr/src/my-app

# Install app dependencies
COPY . /usr/src/my-app
RUN npm install

# Add entrypoint
ADD entrypoint.sh /entrypoint.sh
RUN chmod +x /entrypoint.sh
ENTRYPOINT ["/entrypoint.sh"]

CMD ["npm", "start"]
Docker Image
Images are read-only templates that you build from a set of instructions written in your Dockerfile. Images define both what you want your packaged application and its dependencies to look like and what processes to run when it’s launched.
The Docker image is built using a Dockerfile. Each instruction in the Dockerfile adds a new “layer” to the image, with layers representing a portion of the images file system that either adds to or replaces the layer below it. Layers are key to Docker’s lightweight yet powerful structure. Docker uses a Union File System to achieve this:
Union File Systems
Docker uses Union File Systems to build up an image. You can think of a Union File System as a stackable file system, meaning files and directories of separate file systems (known as branches) can be transparently overlaid to form a single file system.
The contents of directories which have the same path within the overlaid branches are seen as a single merged directory, which avoids the need to create separate copies of each layer. Instead, they can all be given pointers to the same resource; when certain layers need to be modified, it’ll create a copy and modify a local copy, leaving the original unchanged. That’s how file systems can appear writable without actually allowing writes. (In other words, a “copy-on-write” system.)
Layered systems offer two main benefits:
- Duplication-free: layers help avoid duplicating a complete set of files every time you use an image to create and run a new container, making instantiation of docker containers very fast and cheap.
- Layer segregation: Making a change is much faster — when you change an image, Docker only propagates the updates to the layer that was changed.
Volumes
Volumes are the “data” part of a container, initialized when a container is created. Volumes allow you to persist and share a container’s data. Data volumes are separate from the default Union File System and exist as normal directories and files on the host filesystem. So, even if you destroy, update, or rebuild your container, the data volumes will remain untouched. When you want to update a volume, you make changes to it directly. (As an added bonus, data volumes can be shared and reused among multiple containers, which is pretty neat.)
Docker Containers
A Docker container, as discussed above, wraps an application’s software into an invisible box with everything the application needs to run. That includes the operating system, application code, runtime, system tools, system libraries, and etc. Docker containers are built off Docker images. Since images are read-only, Docker adds a read-write file system over the read-only file system of the image to create a container.
Moreover, then creating the container, Docker creates a network interface so that the container can talk to the local host, attaches an available IP address to the container, and executes the process that you specified to run your application when defining the image.
Once you’ve successfully created a container, you can then run it in any environment without having to make changes.
Double-clicking on “containers”
Phew! That’s a lot of moving parts. One thing that always got me curious was how a container is actually implemented, especially since there isn’t any abstract infrastructure boundary around a container. After lots of reading, it all makes sense so here’s my attempt at explaining it to you! :)
The term “container” is really just an abstract concept to describe how a few different features work together to visualize a “container”. Let’s run through them real quick:
1) Namespaces
Namespaces provide containers with their own view of the underlying Linux system, limiting what the container can see and access. When you run a container, Docker creates namespaces that the specific container will use.
There are several different types of namespaces in a kernel that Docker makes use of, for example:
- NET: Provides a container with its own view of the network stack of the system (e.g. its own network devices, IP addresses, IP routing tables, /proc/net directory, port numbers, etc.).
- PID: PID stands for Process ID. If you’ve ever ran ps aux in the command line to check what processes are running on your system, you’ll have seen a column named “PID”. The PID namespace gives containers their own scoped view of processes they can view and interact with, including an independent init (PID 1), which is the “ancestor of all processes”.
- MNT: Gives a container its own view of the “mounts” on the system. So, processes in different mount namespaces have different views of the filesystem hierarchy.
- UTS: UTS stands for UNIX Timesharing System. It allows a process to identify system identifiers (i.e. hostname, domainname, etc.). UTS allows containers to have their own hostname and NIS domain name that is independent of other containers and the host system.
- IPC: IPC stands for InterProcess Communication. IPC namespace is responsible for isolating IPC resources between processes running inside each container.
- USER: This namespace is used to isolate users within each container. It functions by allowing containers to have a different view of the uid (user ID) and gid (group ID) ranges, as compared with the host system. As a result, a process’s uid and gid can be different inside and outside a user namespace, which also allows a process to have an unprivileged user outside a container without sacrificing root privilege inside a container.
Docker uses these namespaces together in order to isolate and begin the creation of a container. The next feature is called control groups.
2) Control groups
Control groups (also called cgroups) is a Linux kernel feature that isolates, prioritizes, and accounts for the resource usage (CPU, memory, disk I/O, network, etc.) of a set of processes. In this sense, a cgroup ensures that Docker containers only use the resources they need — and, if needed, set up limits to what resources a container can use. Cgroups also ensure that a single container doesn’t exhaust one of those resources and bring the entire system down.
Lastly, union file systems is another feature Docker uses:
3) Isolated Union file system:
Described above in the Docker Images section :)
This is really all there is to a Docker container (of course, the devil is in the implementation details — like how to manage the interactions between the various components).
The Future of Docker: Docker and VMs Will Co-exist
While Docker is certainly gaining a lot of steam, I don’t believe it will become a real threat to VMs. Containers will continue to gain ground, but there are many use cases where VMs are still better suited.
For instance, if you need to run multiple applications on multiple servers, it probably makes sense to use VMs. On the other hand, if you need to run many copies of a single application, Docker offers some compelling advantages.
Moreover, while containers allow you to break your application into more functional discrete parts to create a separation of concerns, it also means there’s a growing number of parts to manage, which can get unwieldy.
Security has also been an area of concern with Docker containers — since containers share the same kernel, the barrier between containers is thinner. While a full VM can only issue hypercalls to the host hypervisor, a Docker container can make syscalls to the host kernel, which creates a larger surface area for attack. When security is particularly important, developers are likely to pick VMs, which are isolated by abstracted hardware — making it much more difficult to interfere with each other.
Of course, issues like security and management are certain to evolve as containers get more exposure in production and further scrutiny from users. For now, the debate about containers vs. VMs is really best off to dev ops folks who live and breathe them everyday!