Kubernetes 准入控制器
Sep 15, 2019 22:00 · 4674 words · 10 minute read

Kubernetes 极大地提高了当今生产中后端集群的速度和可管理性。由于灵活、可扩展、易用,Kubernetes 已成为容器编排的事实标准。Kubernetes 还提供了一系列保护功能。而 Admission Controllers(准入控制器) 是一组安全相关的插件,启用后能进一步使用 Kubernetes 更高级的安全功能。
什么是准入控制器?
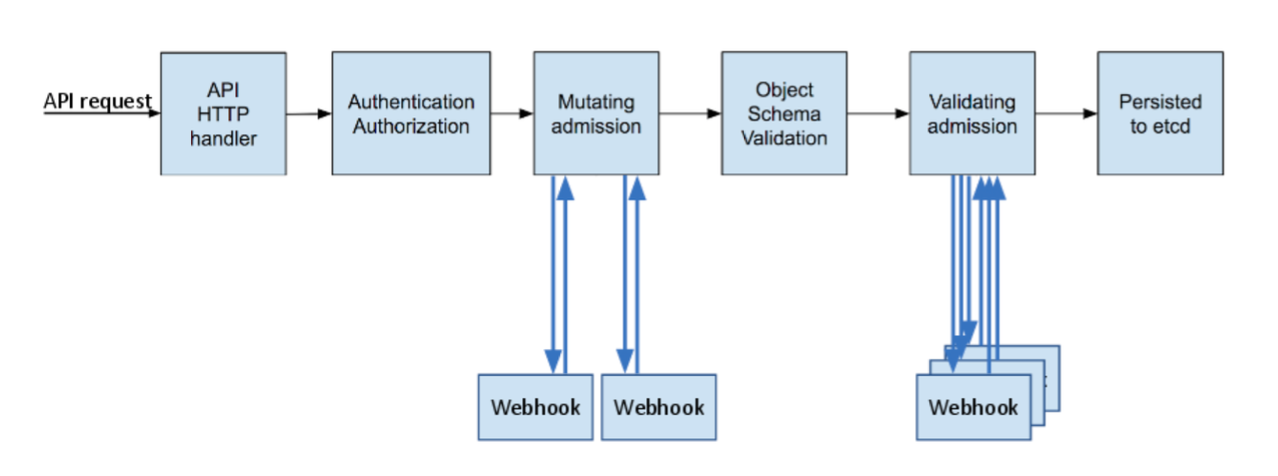
简而言之,Kubernetes 准入控制器是管理和强制定义集群使用方式的插件。可以将它们看作拦截(经过认证的)API 请求的守门员,可以更改请求对象或完全拒绝请求。准入控制的过程分为两步:先变异(mutate)后验证(validate)。举个例子,LimitRanger 准入控制器在变异阶段使用默认的资源配置来限制容器对资源的使用,并在验证阶段确保容器的资源限制不超过预期的。
值得一提的是,许多用户认为内置的 Kubernetes 操作的某些方面实际上由准入控制器管理。举个例子,当一个命名空间被删除随后进入 Terminating(终止) 状态时,NamespaceLifecycle 准入控制器将阻止任何对象在此命名空间内被创建。
在30多种准入控制器中,ValidatingAdmissionWebhooks 和 MutatingAdmissionWebhooks (从1.13版开始两者都处于beta状态)比较特殊。它们有着无限的灵活性,但本身并没有实现任何决策逻辑,而是从集群内运行的 webhook 服务获取相应的操作。无论何时在 Kubernetes 集群中创建、更新或删除资源,都允许用户实现自定义逻辑。
mutating admission webhooks 可以变异(篡改)API 对象,validating admission webhooks 不行。虽然 mutating admission webhooks 也可以做到拒绝请求,但是 validating admission webhooks 与前者相比有两个主要优点:第一,出于安全方面的考虑可能得禁用 MutatingAdmissionWebhook 准入控制器(或者设置严格的 RBAC 限制),因为可能引起混乱甚至有危险的副作用。第二,如上图所示,validating admission 控制器在 mutating admission 之后运行,因此,validating admission webhook 看到的任何请求对象都是即将被保存到 etcd 中的最终版。
如何开启准入控制器?
在 Kubernetes API server 的启动参数中带上:
--enable-admission-plugins=ValidatingAdmissionWebhook,MutatingAdmissionWebhook
–-admission-control在 1.10 版本中就被废除,取而代之的是–-enable-admission-plugins
建议默认启用以下准入控制器:
--enable-admission-plugins=NamespaceLifecycle,LimitRanger,ServiceAccount,DefaultStorageClass,DefaultTolerationSeconds,MutatingAdmissionWebhook,ValidatingAdmissionWebhook,Priority,ResourceQuota,PodSecurityPolicy
点击官方文档中查看中完整准入控制器以及说明。
为什么需要准入控制器?
- 安全:准入控制器可以通过在整个命名空间或集群中强制使用合理的安全基准来提高安全性。内置的
PodSecurityPolicy准入控制器是典型的例子:禁止容器以 root 身份运行,或者确保容器的 rootfs 始终以只读的权限挂载。当然也可以通过基于 webkook 的准入控制器来实现:- 只允许从特定的 registry 拉取镜像,拒绝访问未知的 registry。
- 拒绝不符合安全标准的部署。
- 管控:准入控制器强制你遵循某些格式,比如良好的标签、注释、资源限制等等。
- 对不同对象强制执行标签验证,确保标签与对象正确吻合。
- 自动给对象添加 annotation。
- 配置管理:准入控制器验证集群中运行的对象的配置,防止任何显式的错误配置直接生效。
- 自动添加或验证资源限制
- 确保 pod 被添加了合理的标签
- 确保生产部署中不使用最新 (
latest) 的镜像版本
通过这种方式,准入控制器和策略管理有助于确保应用程序在不断变化的控制环境中保持合法。
编写和部署 Admission Controller Webhook
我们用一个 Kubernetes 的缺点来说明如何利用准入控制器 webhook 来建立自定义安全策略:许多默认设置为了易于使用并减少冲突而优化,不免牺牲一定的安全性。其中之一就是默认允许容器以 root 身份运行(而且,如果没有在 Dockerfile 中使用 USER 命令配置,也将是这样)。尽管容器有一定程度隔离,以 root 身份运行还是会增加风险——这在生产环境中应当被避免。最近被曝光的 runC 漏洞 (CVE-2019-5736),只有在以 root 身份运行容器时才会搞事。
你可以使用自定义 mutating admission controller webhook 来应用更安全的默认配置:除非明确要求,webhook 将确保 pod 以非 root 用户运行(如果没有明确说明,我们将分配 uid 为1234)。注意,这个设置不会阻止你在集群中部署任何工作负载,包括那些需要以 root 身份运行的合法应用。只需要在部署配置中明确启用此风险程序操作模式。
repo: https://github.com/stackrox/admission-controller-webhook-demo
Mutating Webhook Configuration
创建 MutatingWebhookConfiguration 对象来定义 mutating admission controller webhook:
apiVersion: admissionregistration.k8s.io/v1beta1
kind: MutatingWebhookConfiguration
metadata:
  name: demo-webhook
webhooks:
  - name: webhook-server.webhook-demo.svc
    clientConfig:
      service:
        name: webhook-server
        namespace: webhook-demo
        path: "/mutate"
      caBundle: ${CA_PEM_B64}
    rules:
      - operations: [ "CREATE" ]
        apiGroups: [""]
        apiVersions: ["v1"]
        resources: ["pods"]
这份配置定义了 webhook-server.webhook-demo.svc 这个 webhook,当 pod 创建时 Kubernetes API server 将发送 HTTP POST 请求至 /mutate 路径。
Webhook REST API
API server 向指定接口发送 HTTP POST 请求,请求体中带上 JSON 格式的 AdmissionReview(Request 字段)。同样响应也是 JSON 格式的 AdmissionReview(Response 字段)。
demo repo 中包含了一个序列化/反序列化的函数,你只需要专注于实现操作 Kubernetes API 对象的逻辑就行了。在这个例子中,实现准入控制器逻辑的函数是 applySecurityDefaults,并在 HTTPS 服务中与 /mutate 路由绑定:
mux := http.NewServeMux()
mux.Handle("/mutate", admitFuncHandler(applySecurityDefaults))
server := &http.Server{
  Addr:    ":8443",
  Handler: mux,
}
log.Fatal(server.ListenAndServeTLS(certPath, keyPath))
创建一个 Service 对象来将443端口映射至容器的8443端口:
apiVersion: v1
kind: Service
metadata:
  name: webhook-server
  namespace: webhook-demo
spec:
  selector:
    app: webhook-server  # specified by the deployment/pod
  ports:
    - port: 443
      targetPort: webhook-api  # name of port 8443 of the container
对象变异逻辑
mutating admission controller webhook 通过 JSON 补丁 来变异。下面的 Go 数据结构大致描述了一下:
type patchOperation struct {
  Op    string      `json:"op"`
  Path  string      `json:"path"`
  Value interface{} `json:"value,omitempty"`
}
要把 pod 的 .spec.securityContext.runAsNonRoot 字段设置为 true,我们构建下面的 patchOperation 对象:
patches = append(patches, patchOperation{
  Op:    "add",
  Path:  "/spec/securityContext/runAsNonRoot",
  Value: true,
})
TLS 证书
由于必须走 HTTPS,需要提供 TLS 证书。自签名证书也可以(由一个自签名的 CA 签名),但是我们需要 Kubernetes 在于 webhook 服务器通信时指定相应的 CA 证书。此外,证书的 CN 要和 Kubernetes API server 所使用的服务器名称匹配,内部的 Service 域名为 <service-name>.<namespace>.svc,在我们的例子中为 webhook-server.webhook-demo.svc。由于自签名 TLS 证书的生成方法 Google 上一大把,我们就在示例中引用相应的 shell 脚本了。
前面的 Webbook 配置包含了占位符 ${CA_PEM_B64}。在我们创建它之前,需要替换成 BASE64 编码后的 CA PEM 证书。openssl base64 -A 命令可以做到。
测试
测试案例:
- 未指定安全上下文的 pod。我们期望这个 pod 以 uid 为1234的非 root 用户身份运行。
- 指定安全上下文的 pod,显示地以 root 用户运行。
- 配置冲突的 pod,指定了必须以非 root 用户运行,但是 uid 为0。
通过执行 kubectl create -f examples/<name>.yaml 来创建这些 pod。在前两个例子中,验证用户身份:
$ kubectl create -f examples/pod-with-defaults.yaml
$ kubectl logs pod-with-defaults
I am running as user 1234
第三个例子中,创建操作会被拒绝:
$ kubectl create -f examples/pod-with-conflict.yaml
Error from server (InternalError): error when creating "examples/pod-with-conflict.yaml": Internal error occurred: admission webhook "webhook-server.webhook-demo.svc" denied the request: runAsNonRoot specified, but runAsUser set to 0 (the root user)
引用
- https://kubernetes.io/docs/reference/access-authn-authz/admission-controllers/
- https://docs.okd.io/latest/architecture/additional_concepts/dynamic_admission_controllers.html
- https://kubernetes.io/blog/2018/01/extensible-admission-is-beta/
- https://medium.com/ibm-cloud/diving-into-kubernetes-mutatingadmissionwebhook-6ef3c5695f74
- https://github.com/kubernetes/kubernetes/blob/v1.10.0-beta.1/test/images/webhook/main.go
- https://github.com/istio/istio
- https://www.stackrox.com/post/2019/02/the-runc-vulnerability-a-deep-dive-on-protecting-yourself/
A Guide to Kubernetes Admission Controllers
Kubernetes has greatly improved the speed and manageability of backend clusters in production today. Kubernetes has emerged as the de facto standard in container orchestrators thanks to its flexibility, scalability, and ease of use. Kubernetes also provides a range of features that secure production workloads. A more recent introduction in security features is a set of plugins called “admission controllers”. Admission controllers must be enabled to use some of the more advanced security features of Kubernetes, such as pod security policies that enforce a security configuration baseline across an entire namespace. The following must-know tips and tricks will help you leverage admission controllers to make the most of these security capabilities in Kubernetes.
What are Kubernetes admission controllers?
In a nutshell, Kubernetes admission controllers are plugins that govern and enforce how the cluster is used. They can be thought of as a gatekeeper that intercept (authenticated) API requests and may change the request object or deny the request altogether. The admission control process has two phases: the mutating phase is executed first, followed by the validating phase. Consequently, admission controllers can act as mutating or validating controllers or as a combination of both. For example, the LimitRanger admission controller can augment pods with default resource requests and limits (mutating phase), as well as verify that pods with explicitly set resource requirements do not exceed the per-namespace limits specified in the LimitRange object (validating phase).
It is worth noting that some aspects of Kubernetes’ operation that many users would consider built-in are in fact governed by admission controllers. For example, when a namespace is deleted and subsequently enters the Terminating state, the NamespaceLifecycle admission controller is what prevents any new objects from being created in this namespace.
Among the more than 30 admission controllers shipped with Kubernetes, two take a special role because of their nearly limitless flexibility - ValidatingAdmissionWebhooks and MutatingAdmissionWebhooks, both of which are in beta status as of Kubernetes 1.13. We will examine these two admission controllers closely, as they do not implement any policy decision logic themselves. Instead, the respective action is obtained from a REST endpoint (a webhook) of a service running inside the cluster. This approach decouples the admission controller logic from the Kubernetes API server, thus allowing users to implement custom logic to be executed whenever resources are created, updated, or deleted in a Kubernetes cluster.
The difference between the two kinds of admission controller webhooks is pretty much self-explanatory: mutating admission webhooks may mutate the objects, while validating admission webhooks may not. However, even a mutating admission webhook can reject requests and thus act in a validating fashion. Validating admission webhooks have two main advantages over mutating ones: first, for security reasons it might be desirable to disable the MutatingAdmissionWebhook admission controller (or apply stricter RBAC restrictions as to who may create MutatingWebhookConfiguration objects) because of its potentially confusing or even dangerous side effects. Second, as shown in the previous diagram, validating admission controllers (and thus webhooks) are run after any mutating ones. As a result, whatever request object a validating webhook sees is the final version that would be persisted to etcd.
The set of enabled admission controllers is configured by passing a flag to the Kubernetes API server. Note that the old –admission-control flag was deprecated in 1.10 and replaced with –enable-admission-plugins.
--enable-admission-plugins=ValidatingAdmissionWebhook,MutatingAdmissionWebhook
Kubernetes recommends the following admission controllers to be enabled by default.
--enable-admission-plugins=NamespaceLifecycle,LimitRanger,ServiceAccount,DefaultStorageClass,DefaultTolerationSeconds,MutatingAdmissionWebhook,ValidatingAdmissionWebhook,Priority,ResourceQuota,PodSecurityPolicy
The complete list of admission controllers with their descriptions can be found in the official Kubernetes reference. This discussion will focus only on the webhook-based admission controllers.
Why do I need admission controllers?
- Security: Admission controllers can increase security by mandating a reasonable security baseline across an entire namespace or cluster. The built-in
PodSecurityPolicyadmission controller is perhaps the most prominent example; it can be used for disallowing containers from running as root or making sure the container’s root filesystem is always mounted read-only, for example. Further use cases that can be realized by custom, webhook-based admission controllers include:- Allow pulling images only from specific registries known to the enterprise, while denying unknown image registries.
- Reject deployments that do not meet security standards. For example, containers using the
privilegedflag can circumvent a lot of security checks. This risk could be mitigated by a webhook-based admission controller that either rejects such deployments (validating) or overrides theprivilegedflag, setting it tofalse.
- Governance: Admission controllers allow you to enforce the adherence to certain practices such as having good labels, annotations, resource limits, or other settings. Some of the common scenarios include:
- Enforce label validation on different objects to ensure proper labels are being used for various objects, such as every object being assigned to a team or project, or every deployment specifying an app label.
- Automatically add annotations to objects, such as attributing the correct cost center for a “dev” deployment resource.
- Configuration management: Admission controllers allow you to validate the configuration of the objects running in the cluster and prevent any obvious misconfigurations from hitting your cluster. Admission controllers can be useful in detecting and fixing images deployed without semantic tags, such as by:
- automatically adding resource limits or validating resource limits,
- ensuring reasonable labels are added to pods, or
- ensuring image references used in production deployments are not using the
latesttags, or tags with a-devsuffix.
In this way, admission controllers and policy management help make sure that applications stay in compliance within an ever-changing landscape of controls.
Example: Writing and Deploying an Admission Controller Webhook
To illustrate how admission controller webhooks can be leveraged to establish custom security policies, let’s consider an example that addresses one of the shortcomings of Kubernetes: a lot of its defaults are optimized for ease of use and reducing friction, sometimes at the expense of security. One of these settings is that containers are by default allowed to run as root (and, without further configuration and no USER directive in the Dockerfile, will also do so). Even though containers are isolated from the underlying host to a certain extent, running containers as root does increase the risk profile of your deployment— and should be avoided as one of many security best practices. The recently exposed runC vulnerability (CVE-2019-5736), for example, could be exploited only if the container ran as root.
You can use a custom mutating admission controller webhook to apply more secure defaults: unless explicitly requested, our webhook will ensure that pods run as a non-root user (we assign the user ID 1234 if no explicit assignment has been made). Note that this setup does not prevent you from deploying any workloads in your cluster, including those that legitimately require running as root. It only requires you to explicitly enable this risker mode of operation in the deployment configuration, while defaulting to non-root mode for all other workloads.
The full code along with deployment instructions can be found in our accompanying GitHub repository. Here, we will highlight a few of the more subtle aspects about how webhooks work.
Mutating Webhook Configuration
A mutating admission controller webhook is defined by creating a MutatingWebhookConfiguration object in Kubernetes. In our example, we use the following configuration:
apiVersion: admissionregistration.k8s.io/v1beta1
kind: MutatingWebhookConfiguration
metadata:
  name: demo-webhook
webhooks:
  - name: webhook-server.webhook-demo.svc
    clientConfig:
      service:
        name: webhook-server
        namespace: webhook-demo
        path: "/mutate"
      caBundle: ${CA_PEM_B64}
    rules:
      - operations: [ "CREATE" ]
        apiGroups: [""]
        apiVersions: ["v1"]
        resources: ["pods"]
This configuration defines a webhook webhook-server.webhook-demo.svc, and instructs the Kubernetes API server to consult the service webhook-server in namespace webhook-demo whenever a pod is created by making a HTTP POST request to the /mutate URL. For this configuration to work, several prerequisites have to be met.
Webhook REST API
The Kubernetes API server makes an HTTPS POST request to the given service and URL path, with a JSON-encoded AdmissionReview (with the Request field set) in the request body. The response should in turn be a JSON-encoded AdmissionReview, this time with the Response field set.
Our demo repository contains a function that takes care of the serialization/deserialization boilerplate code and allows you to focus on implementing the logic operating on Kubernetes API objects. In our example, the function implementing the admission controller logic is called applySecurityDefaults, and an HTTPS server serving this function under the /mutate URL can be set up as follows:
mux := http.NewServeMux()
mux.Handle("/mutate", admitFuncHandler(applySecurityDefaults))
server := &http.Server{
  Addr:    ":8443",
  Handler: mux,
}
log.Fatal(server.ListenAndServeTLS(certPath, keyPath))
Note that for the server to run without elevated privileges, we have the HTTP server listen on port 8443. Kubernetes does not allow specifying a port in the webhook configuration; it always assumes the HTTPS port 443. However, since a service object is required anyway, we can easily map port 443 of the service to port 8443 on the container:
apiVersion: v1
kind: Service
metadata:
  name: webhook-server
  namespace: webhook-demo
spec:
  selector:
    app: webhook-server  # specified by the deployment/pod
  ports:
    - port: 443
      targetPort: webhook-api  # name of port 8443 of the container
Object Modification Logic
In a mutating admission controller webhook, mutations are performed via JSON patches. While the JSON patch standard includes a lot of intricacies that go well beyond the scope of this discussion, the Go data structure in our example as well as its usage should give the user a good initial overview of how JSON patches work:
type patchOperation struct {
  Op    string      `json:"op"`
  Path  string      `json:"path"`
  Value interface{} `json:"value,omitempty"`
}
For setting the field .spec.securityContext.runAsNonRoot of a pod to true, we construct the following patchOperation object:
patches = append(patches, patchOperation{
  Op:    "add",
  Path:  "/spec/securityContext/runAsNonRoot",
  Value: true,
})
TLS Certificates
Since a webhook must be served via HTTPS, we need proper certificates for the server. These certificates can be self-signed (rather: signed by a self-signed CA), but we need Kubernetes to instruct the respective CA certificate when talking to the webhook server. In addition, the common name (CN) of the certificate must match the server name used by the Kubernetes API server, which for internal services is <service-name>.<namespace>.svc, i.e., webhook-server.webhook-demo.svc in our case. Since the generation of self-signed TLS certificates is well documented across the Internet, we simply refer to the respective shell script in our example.
The webhook configuration shown previously contains a placeholder ${CA_PEM_B64}. Before we can create this configuration, we need to replace this portion with the Base64-encoded PEM certificate of the CA. The openssl base64 -A command can be used for this purpose.
Testing the Webhook
After deploying the webhook server and configuring it, which can be done by invoking the ./deploy.sh script from the repository, it is time to test and verify that the webhook indeed does its job. The repository contains three examples:
- A pod that does not specify a security context (
pod-with-defaults). We expect this pod to be run as non-root with user id 1234. - A pod that does specify a security context, explicitly allowing it to run as root (
pod-with-override). - A pod with a conflicting configuration, specifying it must run as non-root but with a user id of 0 (
pod-with-conflict). To showcase the rejection of object creation requests, we have augmented our admission controller logic to reject such obvious misconfigurations.
Create one of these pods by running kubectl create -f examples/<name>.yaml. In the first two examples, you can verify the user id under which the pod ran by inspecting the logs, for example:
$ kubectl create -f examples/pod-with-defaults.yaml
$ kubectl logs pod-with-defaults
I am running as user 1234
In the third example, the object creation should be rejected with an appropriate error message:
$ kubectl create -f examples/pod-with-conflict.yaml
Error from server (InternalError): error when creating "examples/pod-with-conflict.yaml": Internal error occurred: admission webhook "webhook-server.webhook-demo.svc" denied the request: runAsNonRoot specified, but runAsUser set to 0 (the root user)
Feel free to test this with your own workloads as well. Of course, you can also experiment a little bit further by changing the logic of the webhook and see how the changes affect object creation. More information on how to do experiment with such changes can be found in the repository’s readme.
Summary
Kubernetes admission controllers offer significant advantages for security. Digging into two powerful examples, with accompanying available code, will help you get started on leveraging these powerful capabilities.
References:
- https://kubernetes.io/docs/reference/access-authn-authz/admission-controllers/
- https://docs.okd.io/latest/architecture/additional_concepts/dynamic_admission_controllers.html
- https://kubernetes.io/blog/2018/01/extensible-admission-is-beta/
- https://medium.com/ibm-cloud/diving-into-kubernetes-mutatingadmissionwebhook-6ef3c5695f74
- https://github.com/kubernetes/kubernetes/blob/v1.10.0-beta.1/test/images/webhook/main.go
- https://github.com/istio/istio
- https://www.stackrox.com/post/2019/02/the-runc-vulnerability-a-deep-dive-on-protecting-yourself/